Project Status: Ongoing
Introduction
I’ve been a fan of the general look of early Tudor clothing since I bought and read The King’s Servants published by the Tudor Tailor group. I especially love the fact that the different wardrobes shown are all based on the actual livery issue each person received, as listed in the Royal Wardrobe accounts. I’d been contemplating making the general wardrobe when I received a post that the patterns were available on special, and I promptly bought a set to make the full outfit.
The early Tudor doublet is the first garment from the wardrobe I decided to construct. Where possible I am using period construction techniques, to get a feel for the time it takes to make a garment without machines. In other words, I’m trying to completely sew the doublet by hand.
This project started on Australia Day 2014, and is currently on hiatus awaiting me getting around to sewing all the eyelets for lacing the doublet together. It’s been an on again off again type of project.
The Pattern
The pattern I’m using is made by the Tudor Tailor and is their Pattern for Early Tudor Man’s Doublet, Hose, Jacket and Coat – Large Sizes. I purchased this one as it gave me all the patterns I’d need for a full wardrobe.
Having experienced commercial patterns before, I first made a mock-up of the pattern in calico to trial a test fit of the garment. Due to my fencing background, I’ve found I have some odd musculature that I need to account for in some patterns, and always do a test fit such as this before I start.
The Tudor Tailor patterns all need to have seam allowance added. You can see what I’ve done here as I mark out the mock-up…

The next step is to put the mock-up together and give it a test fit. In this case I’ve pinned it together along the seam lines, but I’m only putting one sleeve on.


Surprisingly to me, the mock-up fits pretty well when I tried it. As you can see with the back view it’s just been pinned together, but the lines are great. Buoyed with confidence I moved onto construction.
Making the Doublet Body
The fabrics for this doublet all come from my fabric stash, which were all previously sourced from Em Greenfields in Surry Hills here in Sydney. For the inner and outer layers I’m using a 235 gsm weight linen cotton blend fabric (55% linen 45% cotton) in white. The mid-layer canvas body is an unbleached 295 gsm (10 oz) weight 100% cotton canvas. All fabrics were washed and ironed before cutting, to ensure a minimum amout of shrinkage after construction.
One of the key points we learn from the Royal Wardrobe accounts is the amount of canvas issued for a doublet. It’s consistently just enough to support the body pieces, which makes sense as they take most of the strain for holding up the hose. Since this is the layer that supports the outer fabric, I cut it out first. It should be noted that there is no seam allowance added for the canvas when you hand sew the doublet.

The next step was to attach the outer fabric layers to the body canvas pieces. In this case I’ve folded the seam allowances over the edges of the canvas layer and sewn them down using pick stitches. The curved areas of the outer layer at the armpit and neck hole have been slit nearly to the edge to allow them to fold properly and sit smoothly. This attaches the two fabric layers together, providing the body we need for each piece as well as overbinding the edges of the canvas and outer fabrics, preventing them from fraying.

With all the panel pieces prepared, I could then join the panels together to make the body proper. The order of assembly as join back pieces through centre, then attach front pieces at shoulders and finally attach front and back pieces at the side seams. The panels have been joined using a whip stitch on the edge, each stitch being about 1-2 mm apart, and only through the outer fabric avoiding catching the canvas as much as possible. Once the body was sewn each seam was pressed flat from the face side, which as we can see leaves and almost negligible ridge on the centre of each seam. These seams are unbelievably strong despite their simplicity, which really surprised me. With some on again off again work, I’d gotten to this point by the 24 Feb 2014, really only putting in a couple of hours of hand sewing each week.


With the body stitched, I then repeated the process for the 2 collar pieces. These were a lot more fiddly due to the overlap of the seam allowances at the thinner front section of each collar piece. There was a lot of procrastination going on here, so these didn’t get done until 31 Aug 2014.

With the individual collar pieces prepared, I then stitched them together at the back and pressed the seams flat. After which, I then carefully stitched the collar into the neck of the body, easing the pieces together to ensure they cam together cleanly at the front of the doublet. Again, the seam was pressed flat after completion.

With the collar attached and pressed, I then moved onto sewing together the body and collar of the lining for the doublet, as I’d cut them from the same fabric as the outer fabric when I’d cut out those pieces.
Making the Doublet Lining
Construction for the lining is slightly different than what is done for the body. In this case I’ve folded and pressed the edges of the main garment seams and then sewn the individual pieces together. The raw edges haven’t been tacked down like I did with the doublet body. Sewing order was again back seam, shoulder seams then side seams.

The collar like the body pieces for the lining has just been folded and whip stitched together along the main seam line. After this I’ll turn the bottom edge and stitch it to the lining body.

Stitching the collar and body pieces together for the lining was a bit trickier due to the extra stretch you have in a single layer of fabric. I found it easiest to in it at the middle, then at the end and then ease the pieces around until it’s uniformly stretched and neat. Lots of pins at this stage is your friend. Once that’s done I could then stitch the pieces together as usual with whip stitches. Once done it was pressed out flat, and as you can see below came out very smooth and unwrinkled!

With the collars attached to both the main doublet body and the lining body, I’m ready to tackle the sleeves. I’d progressed to this point on 5 Sep 2014.
Making the Doublet Sleeves
So it was a couple of weeks before I could get onto the sleeves, which I started cutting out 14 Sep 2014. As you can see from the photo, I’ve not really marked out the seam allowance, except for at the sleeve cap ends where it’s a bit harder to maintain the even distance from the marking lines. For the straight sides I just cut by eye.

Once each sleeve was cut out, the raw edges for each side have been folded and pressed, then tacked down to prevent them from fraying. I’m doing both the outer and lining sleeves the same way, since they need to be a little more robust than the body as they don’t have the canvas support.

Here’s a close up of the tacking stitch I’ve used. It’s a basic whip stitch but used as a pick stitch so that you don’t have big stitches showing on the outside.

Once the edges were tacked down, I then stitched them together along the arm seam and pressed them flat. The pattern doesn’t completely close up the seam at the wrist, as this is closed with a button or lace so that it sits tight to the wrist. The point where the seam ends at the wrist has been over-stitched several times to give it strength, preventing it from ripping apart in use.


The completed sleeves then had their sleeve caps folded down and the raw ends tacked in place to prevent fraying. Once this was done, the sleeves were then pinned into the body, being careful to ease it all in carefully to prevent puckering. Again lots of pins were my friend. Once I was happy with the pinning, the sleeves were stitched into place with my usual small whip stitches. Surprisingly, sewing sleeves in was much easier to do this way by hand than all the times I’ve done them by machine.

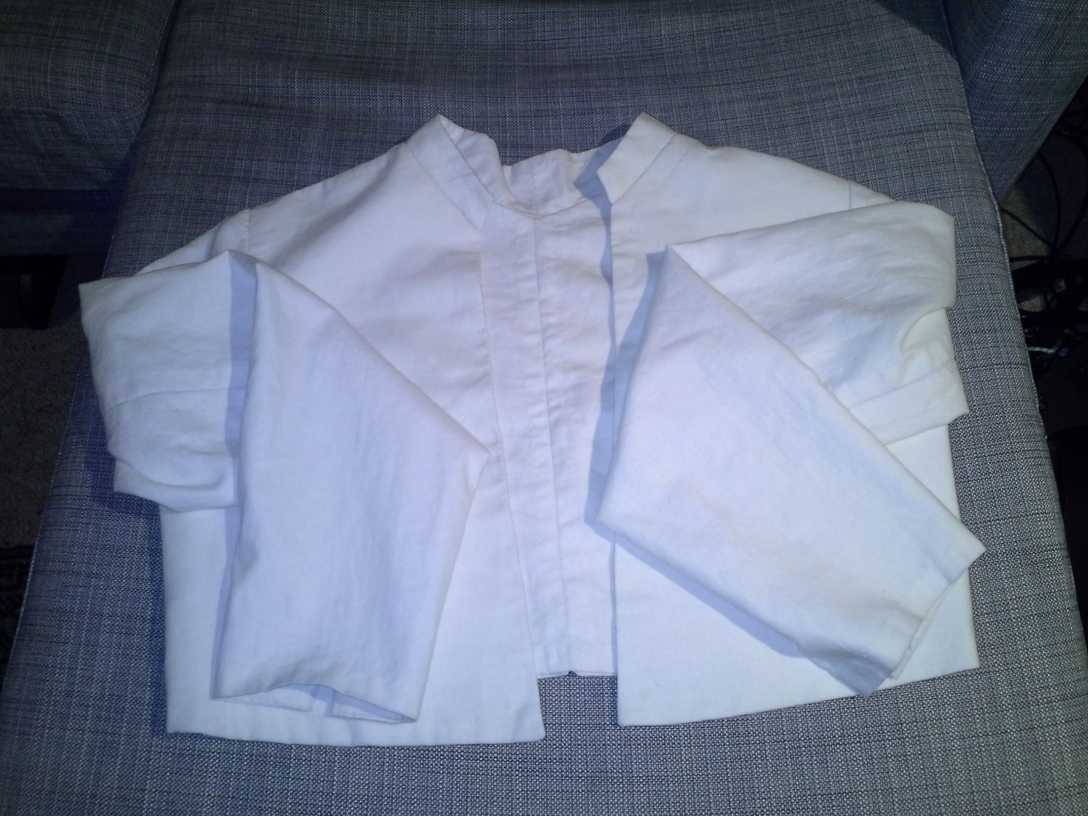
With the doublet body done, it was rinse and repeat for the doublet lining, sewing the sleeves into the lining body. As you can see from the photos, the finish I got was very smooth and consistent, which I’m very happy about. I’d reached this stage of the construction on 6 Oct 2014.

Attaching the Doublet Lining to the Doublet Body
The lining is inserted into the doublet proper as a bag lining. The edges are folded up to meet close to the edge of the doublet proper and then stitched in place using blind hemming stitch. This was probably the slowest part of the hand sewing, until I got into a good rhythm for the stitch. The critical part was to not pull the thread too tight on each stitch otherwise it puckered horribly.

It’s not obvious from the above photo, but the critical part of getting this to sit right was to fix the collar in place first and then come down the two individual front seams before setting the bottom edge in place. The bottom edge required some gentle easing work to ensure all the seams lined up properly.

The collar itself has a running stitch over the join seam to hold the lining in place properly, with back stitching over the points it meets the shoulder and back seams. This helps make the collar sit properly, and not float apart while wearing it.
I reached this point in construction on 26 Oct 2014.
Overall I’m really happy with how this has turned. My big problem now is getting up the energy and courage to do the gazillion and 1 eyelets needed for the lacing points. This is all I need to do to complete the garment. I’ve held off doing these mostly because I want to have the hose made to go with them so that I can get these lacing points to line up properly.
